This short blog post idea came from an update to the Kotlin Compiler plugin for Leiningen, the de facto build tool for Clojure.
What does it do this Kotlin Compiler plugin ? Now that you ask, it is a plugin that compiles Kotlin source files to bytecode useable from the JVM.
Since we are still playing around with OpenCV on the JavaVirtualMachine, this blog post goal will be twofold:
- present how to use Leiningen to compile and run kotlin code,
- present how to incorportate some kotlin library to build simple javafx based UIs
- use this UI to build a simple blurring graphical application, through the use of JavaFX and
Prepare a new Leiningen Project to compile Kotlin code
Supposing here, you have Leiningen installed on your machine so we will just go ahead and create a full empty project.
lein new kotlin0
The above command will create a new empty project with default settings. Of course we need a Leiningen plugin to add kotlin to the soup, so we will add it to the list of plugins dependencies for the project.
(defproject kotlin0 "0.1.0-SNAPSHOT"
  :plugins [[lein-kotlin "0.0.2"]]
  :profiles {:dev
    {:dependencies [[org.jetbrains.kotlin/kotlin-runtime "1.1.4-3"]]}}
  :kotlin-source-path "src"
  :dependencies [
   [org.clojure/clojure "1.8.0"]
  ])
We also specify where the kotlin code will be located, and so let’s say something like an original src folder.
The kotlin runtime is not added as a dependency to the project but as a runtime to the run command to be used.
This would not be a tutorial if we were not saying hello first, so let’s add a kotlin source file in the src folder, and let’s call this class kotlin0.
The content is a simple kotlin hello world.
object kotlin0 {

    @JvmStatic fun main(args: Array<String>) {
        println("hello kotlin")
    }
}
The next step is to compile this kotlin code into something that the JVM understands, so bytecode.
lein kotlin
This will generate the kotlin0.class, the bytecode from the kotlin code:
NikoMacBook% tree target/classes
target/classes
├── META-INF
│   └── maven
│       └── kotlin0
│           └── kotlin0
│               └── pom.properties
└── kotlin0.class

4 directories, 2 files
The class has a main method, so we can execute it. Fortunately for us, this java class name is recognized by lein run directly, so let’s execute it.
lein run -m kotlin0
And finally the setup seems pretty nicely in shape, we get some greetings.
hello kotlin
Auto-mate a few things.
Before going ahead, copy your previous folder to kotlin1, so we can move along but keep what was running before.
cp -fr kotlin0 kotlin1
In kotlin0, it was nice to build and run kotlin code, but why the two steps ? We should first have the kotlin command executed directly for us. Since this is a kotlin only project, we can set the prep-tasks to run kotlin beforehand with [“kotlin”]
If you have clojure or java code as well, make sure to add [“javac” “compile” “kotlin”] instead. Since we are here, let’s set the namespace to the class we want to run all the time.
Finally, let’s also add the auto plugin for leiningen which will re-run tasks on file change. Auto needs to be added to the plugins array, and a reg-exp is added for which files are monitored, here *.ht so any kotlin file.
That gives an updated project.clj file as featured below:
(defproject kotlin1 "0.1.0-SNAPSHOT"

  :plugins [
  [lein-kotlin "0.0.2"]
  [lein-auto "0.1.3"]
  ]
  :prep-tasks ["kotlin"]
  :main "kotlin1"
  :auto {:default {:file-pattern #"\.(kt)$"}}

  :profiles {:dev
    {:dependencies [[org.jetbrains.kotlin/kotlin-runtime "1.1.4-3"]]}}
  :kotlin-source-path "src"
  :kotlin-java-version "1.8"
  :dependencies [
   [org.clojure/clojure "1.8.0"]
  ])
Your new best Leiningen command is now
lein auto run
Where auto is waiting for file changes, and the commands after are executed on each trigger.
Note how the kotlin subcommand itself is called before run via the :prep-tasks settings.
Finally, you can update the code in kotlin1.kt:
object kotlin1 {

    @JvmStatic fun main(args: Array<String>) {
        println("hello kotlin [automatic]")
    }
}
And see that the code is executed automatically.
NikoMacBook% lein auto run

auto> Files changed: src/kotlin1.kt
auto> Running: lein run
kotlin-runtime.jar
hello kotlin [automatic]
auto> Completed.
Try changing the kotlin code in the main function a few time before moving on!
Using Kotlin Libraries: tornadofx
tornadofx is a wrapper for javafx targeted for kotlin. it makes it rather easy to prototype cross-plateforms User Interfaces.
In this world where everything is web view based, there are still a few times, where a quick UI may be useful. Tornadofx prides itself to also work well with Scene Builder, which has just been taken from Oracle by Gluon.
cp -fr kotlin1 kotlin2
After changing a few names in this new copy of the project, we’ll add a new dependency entry for tornadofx. As a reminder this is in project.clj/dependencies section.
[no.tornado/tornadofx "1.7.11"]
In tornadoxfx and JavaFX, Views are the center piece of the action. Views in tornadofx have an init block that makes the content of the view itself.
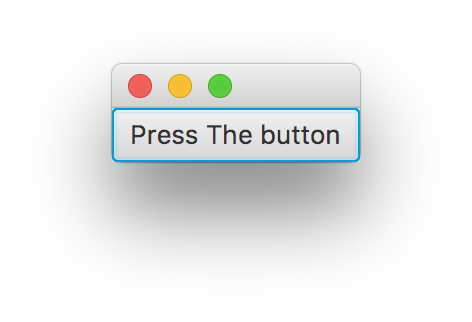
In the coming example, we create a button, with a custom label, and when pressed shows a nice coffee greeting message. The handler for the click is done through the action block.
The Application launcher is the standard JavaFX one, and take custom view and start it as an application. Note, how you the parameter is specified to the launcher with: MyApp::class.java .
import tornadofx.*
import javafx.application.Application
import javafx.scene.layout.*

object kotlin2 {

class HelloFXWorld : View() {
  override val root = VBox()

  init {
    vbox {
        button("Press The button") {
            action { println("Coffee is ready") }
        }
    }
  }
}

class MyApp: App(HelloFXWorld::class)
    @JvmStatic fun main(args: Array<String>) {
      Application.launch(MyApp::class.java, *args)
    }
}

Calling OpenCV from kotlin
So we have seen how to assemble an external library made for kotlin with Kotlin trough Leiningen.
Now, we want to do some image transformation using the JavaVM based OpenCV library. Let’s get this new project from a copy of kotlin1.
cp -fr kotlin1 kotlin3
We add the repository where the OpenCV libraries are hosted:
http://hellonico.info:8081/repository/hellonico/
Then add the 3.3.0 version of those dependencies. OpenCV requires a generic java part and a native part depending on your plateform so make sure to use the one that suits you. The rest of the project.clj file is the same as before.
(defproject kotlin3 "0.1.0-SNAPSHOT"

  :repositories
  [["vendredi" "http://hellonico.info:8081/repository/hellonico/"]]

  :plugins [
  [lein-kotlin "0.0.2"]
  [lein-auto "0.1.3"]
  ]
  :prep-tasks ["kotlin"]
  :main "kotlin3"
  :auto {:default {:file-pattern #"\.(kt)$"}}
  :profiles {:dev
    {:dependencies [[org.jetbrains.kotlin/kotlin-runtime "1.1.4-3"]]}}
  :kotlin-source-path "src"
  :kotlin-java-version "1.8"
  :dependencies [
   [org.clojure/clojure "1.8.0"]
   [opencv/opencv "3.3.0-rc"]
   [opencv/opencv-native "3.3.0-rc" :classifier "osx"]
   ; [opencv/opencv-native "3.3.0-rc" :classifier "linux"]
   ; [opencv/opencv-native "3.3.0-rc" :classifier "win"]
  ]
  )
From now, we should be able to just first, instanciate OpenCV, then load a generic OpenCV Mat object.
The important part is the static init block initializer where the native part of the OpenCV library is being loaded. This is done through some magic from the build tool Leiningen.
import org.opencv.core.*
import org.opencv.core.CvType.*

object kotlin3 {
    init {
        System.loadLibrary(Core.NATIVE_LIBRARY_NAME)
    }

    @JvmStatic fun main(args: Array<String>) {
        println("hello opencv")

        val mat = Mat.eye(5, 5, CV_8UC1)
        println(mat.dump())
    }
}
The core of the main function is just creating a standard OpenCV Mat object and showing its byte content.
So after starting the machinery as before with:
lein auto run
The output of the matrix is shown on the command line:
auto> Files changed: src/kotlin3.kt
auto> Running: lein run
hello opencv
[  1,   0,   0,   0,   0;
   0,   1,   0,   0,   0;
   0,   0,   1,   0,   0;
   0,   0,   0,   1,   0;
   0,   0,   0,   0,   1]
auto> Completed.
Printing matrixes is alright, but you will probably have more fun with some real visual operations. Let’s try to blur a cat !
We will add a few more OpenCV imports, to get the functions imread, blur, and imwrite in the current kotlin object.
This now looks like quite standard OpenCV coding ….
import org.opencv.core.*
import org.opencv.core.CvType.*

import org.opencv.imgcodecs.Imgcodecs.*
import org.opencv.imgproc.Imgproc.*
import org.opencv.core.Core.*


object kotlin3 {
  init {
        System.loadLibrary(Core.NATIVE_LIBRARY_NAME)
    }

    @JvmStatic fun main(args: Array<String>) {
        println("blurring")
        val mat = imread("resources/cat.jpg")
        blur(mat,mat, Size(31.0,31.0))
        imwrite("target/blurredcat.jpg", mat)
    }
}
And see the result, while the lein auto run is still running in the background.
Original Cat:

Blurred Cat:

combining all this, drag and drop based FX UI and OpenCV transformations
Lasty, let’s combine OpenCV with a short Kotlin based tornadofx UI. Without much surprises … The leiningen based project.clj file contains a combination of both the OpenCV based example settings, and the tornadofx based example. So we have dependencies for both.
(defproject kotlin4 "0.1.0-SNAPSHOT"
  :repositories
    [["vendredi" "http://hellonico.info:8081/repository/hellonico/"]]
  :plugins [
  [lein-kotlin "0.0.2"]
  [lein-auto "0.1.3"]
  ]
  :prep-tasks ["kotlin"]
  :main "kotlin4"
  :auto {:default {:file-pattern #"\.(kt)$"}}

  :profiles
    {:dev
      {:dependencies [[org.jetbrains.kotlin/kotlin-runtime "1.1.4-3"]]}}
  :kotlin-source-path "src"
  :kotlin-java-version "1.8"
  :dependencies [
   [org.clojure/clojure "1.8.0"]
   [opencv/opencv "3.3.0-rc"]
   [no.tornado/tornadofx "1.7.11"]
   [opencv/opencv-native "3.3.0-rc" :classifier "osx"]
   ; [opencv/opencv-native "3.3.0-rc" :classifier "linux"]
   ; [opencv/opencv-native "3.3.0-rc" :classifier "win"]
  ])
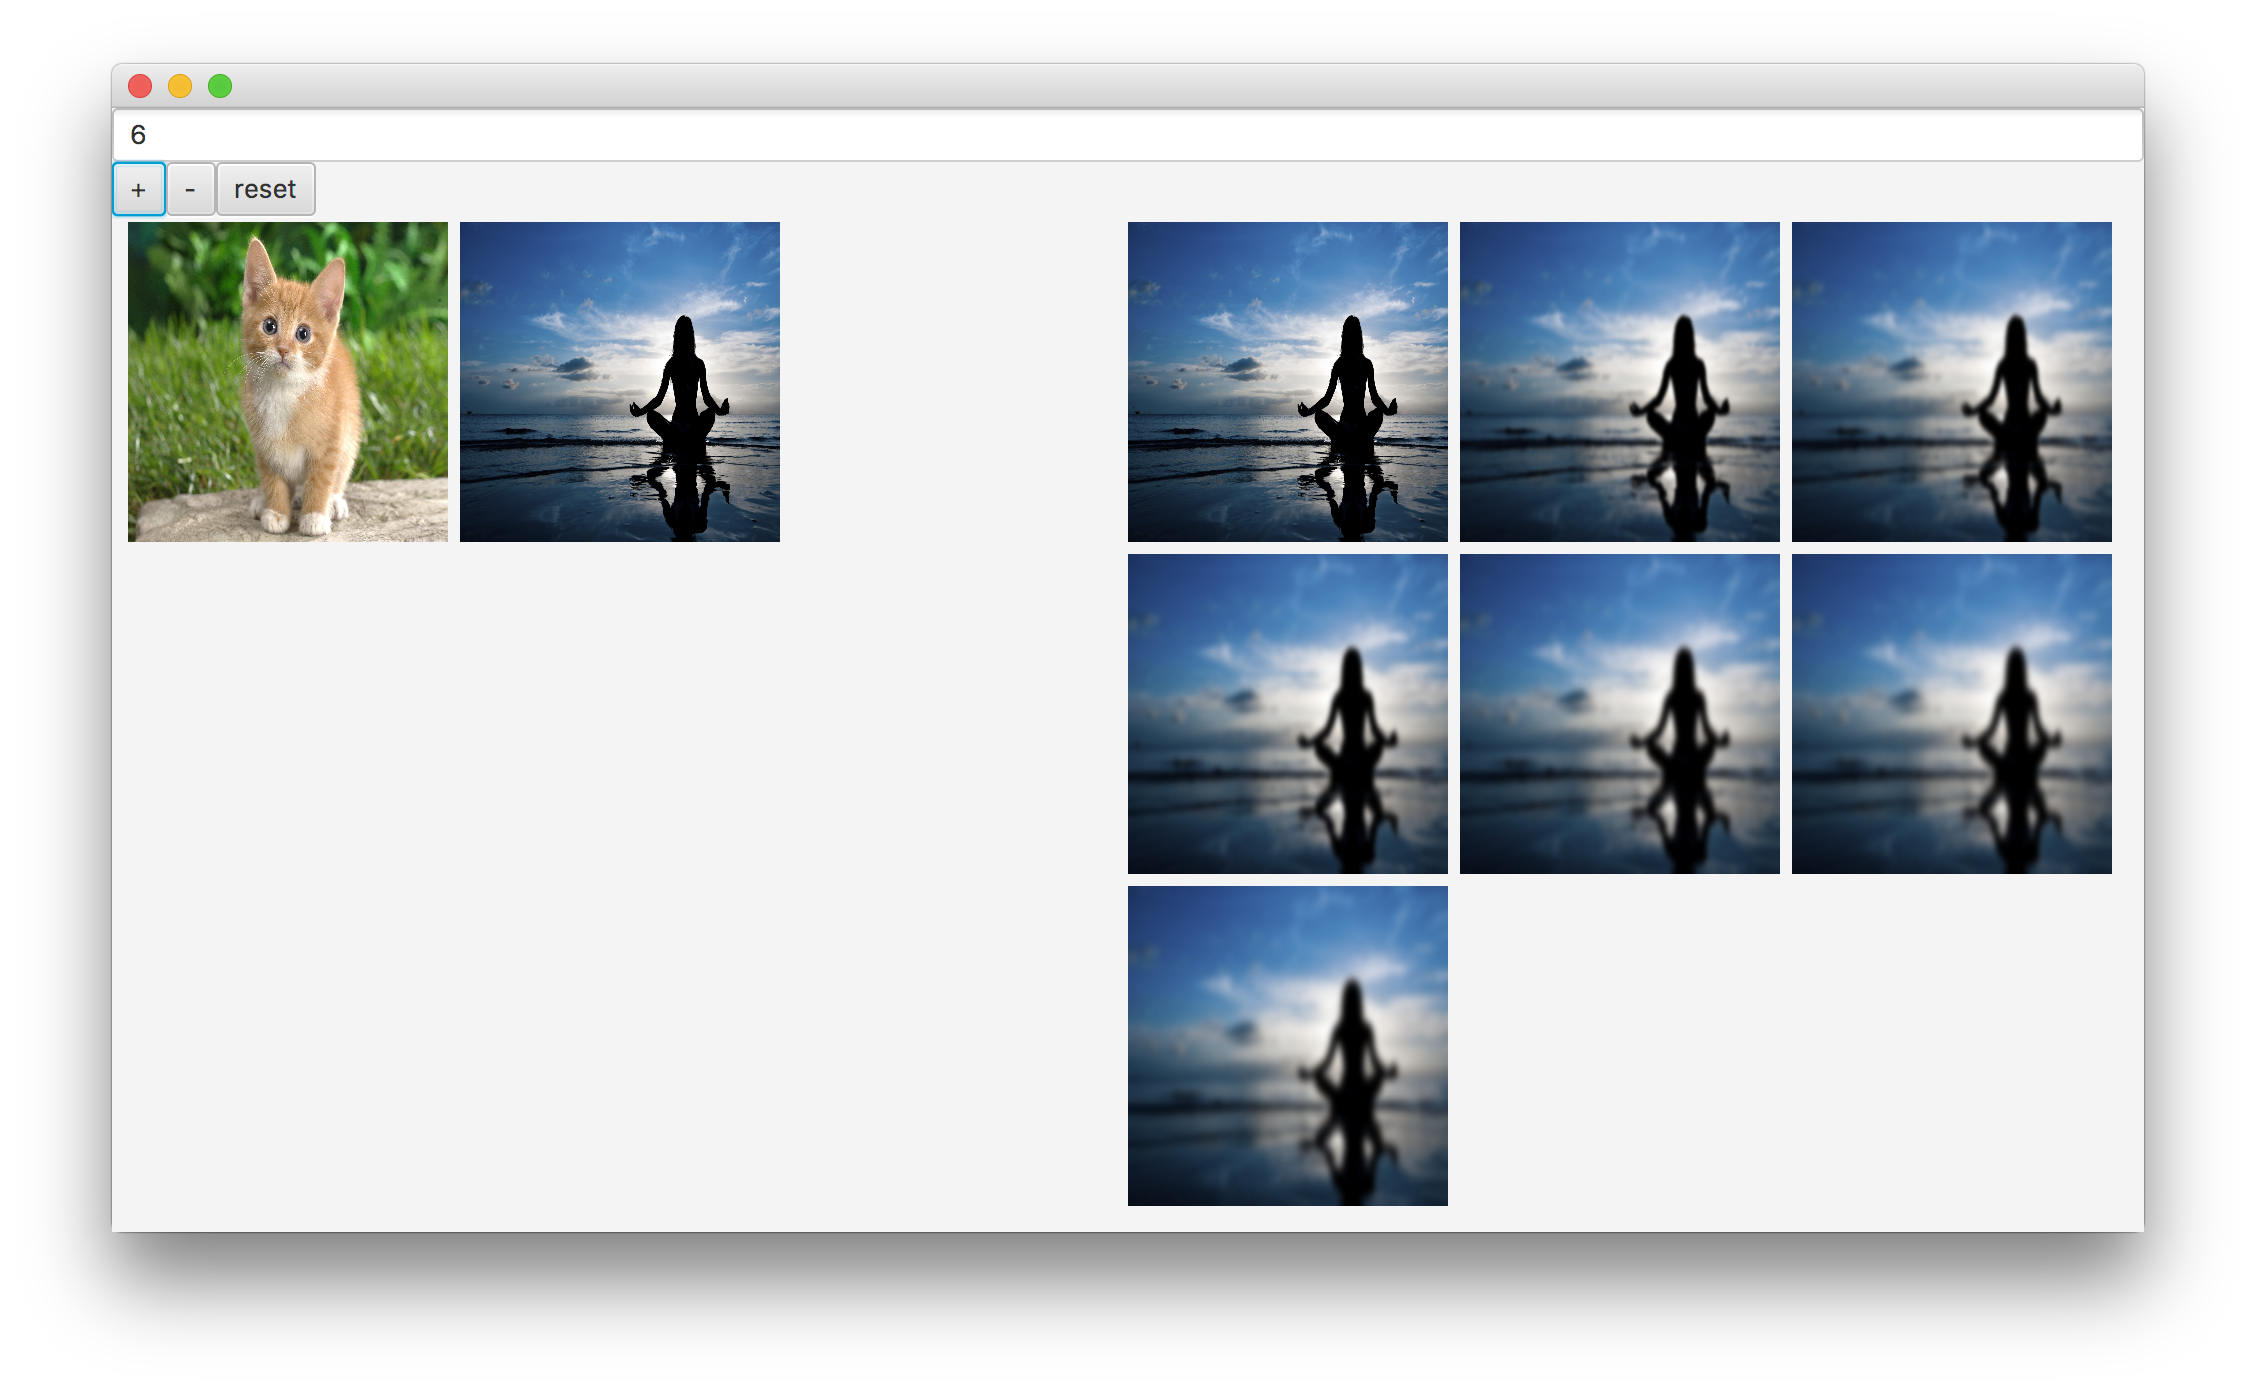
The small application will have a current picture on the left side, and the output of the OpenCV blurring code on the right handside.
Three buttons at the top will increase or reduce the blurring with +/-, and reset will put back the image to its original form.
datagrid are quite easy to use in JavaFX so we’ll use that to present the output of OpenCV.
Finally basic drag and drop support will be added so you can add a new image to the collection to be processed and blur your own picture. The default one will be a cat, found in the project folder.
import org.opencv.core.*
import org.opencv.imgproc.Imgproc.*
import org.opencv.core.Core.*
import org.opencv.imgcodecs.Imgcodecs.*
import org.opencv.core.CvType.*
import clojure.lang.RT

import tornadofx.*
import javafx.application.Application
import javafx.scene.layout.*
import javafx.scene.paint.Color
import javafx.scene.image.Image

class HelloWorld4 : View() {
  var original = "cat.jpg"
  val originals = arrayListOf(original).observable()
  val kittens = arrayListOf(original).observable()
  var counter:Int = 0

  override val root = VBox()
  val textField = textfield(""+counter)

  fun updateField() {
    textField.text=""+counter
  }

  fun currentImage():String {
    return originals.last()
  }

  fun reset() {
    counter = 0
    updateField()
    kittens.clear()
    kittens.add(currentImage())
  }

  fun blurme() {
    val input = imread(currentImage().substring(7)) // remove file://
    var loopC:Int = counter*10;
    for (i in 0..loopC) {
      blur(input,input,Size(7.0,7.0))
    }
    val filename = "/tmp/cat_"+System.currentTimeMillis()+".jpg"
    imwrite(filename, input)
    kittens.add("file://"+filename)
  }
  init {
      with(root) {
        setOnDragEntered { event ->
          val db = event.getDragboard()
          val file = db.getFiles().get(0)
          originals.add("file://"+file.getAbsolutePath())
          reset()
          event.consume()
        }

          root += hbox {
              button("+") { action {
                counter=counter+1
                blurme()
                updateField()
              }}
              button("-") { action {
                counter=counter-1
                if(counter < 0)
                  counter = 0
                blurme()
                updateField()
              }}
              button("reset") { action {
                reset()
              }}
          }
          root += hbox {

            datagrid(originals) {
                  cellCache {
                       imageview(it) {
                         fitHeight = 160.0
                         fitWidth = 160.0
                       }
                  }
            }

            datagrid(kittens) {
                  cellCache {
                       imageview(it) {
                         fitHeight = 160.0
                         fitWidth = 160.0
                       }
                  }
            }

          }
      }
  }

}

class MyApp: App(HelloWorld4::class)


object kotlin4 {
    init {
      RT.loadLibrary(Core.NATIVE_LIBRARY_NAME)
    }

    @JvmStatic fun main(args: Array<String>) {
      Application.launch(MyApp::class.java, *args)
    }

}

Code for all the samples can be found on https://github.com/hellonico/kotlins